
Remember that Giant Crispy Oven-Fried Ground Chicken Cutlet we made on Monday? Well, I am here to fulfill my promise. Transforming that humble foundation into a whole week of easy weeknight dinners. Welcome to the next blockbuster installment. We’ve already mastered the ultimate Chicken Parm. Today, we are taking that exact same shattered-glass crust on a direct flight to Japan: Crispy Ground Chicken Katsu Bowls.

We all love the deep, savory-sweet comfort of a traditional katsu. But the mere thought of dealing with a messy deep-fryer on a random Tuesday night immediately kills all motivation. While classic katsu demands breading and deep-frying whole cuts of pork. I am aggressively ignoring that tradition. Instead, I am taking the rebellious route using my ground chicken sheet-pan method. And let me shout this from the rooftops. Ground turkey is an absolutely flawless, one-to-one swap for this chicken katsu bowls recipe! It’s radically more budget-friendly, incredibly fast, and guarantees a juicy, deeply seasoned interior wrapped in an elite, golden crunch.
Pressing the meat into a single sheet pan is the chef’s “not so secret” hack here. There are no oil splatters to wipe off your counters, and absolutely zero babysitting a hot skillet. The oven does all the heavy lifting while you casually toss together a bright, crunchy slaw.
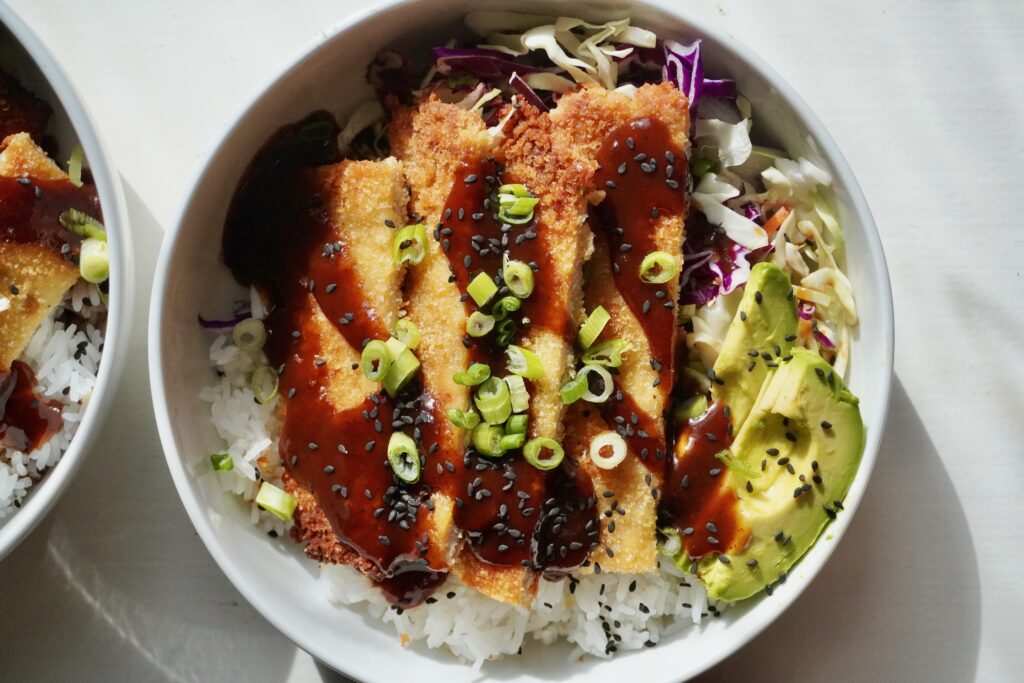
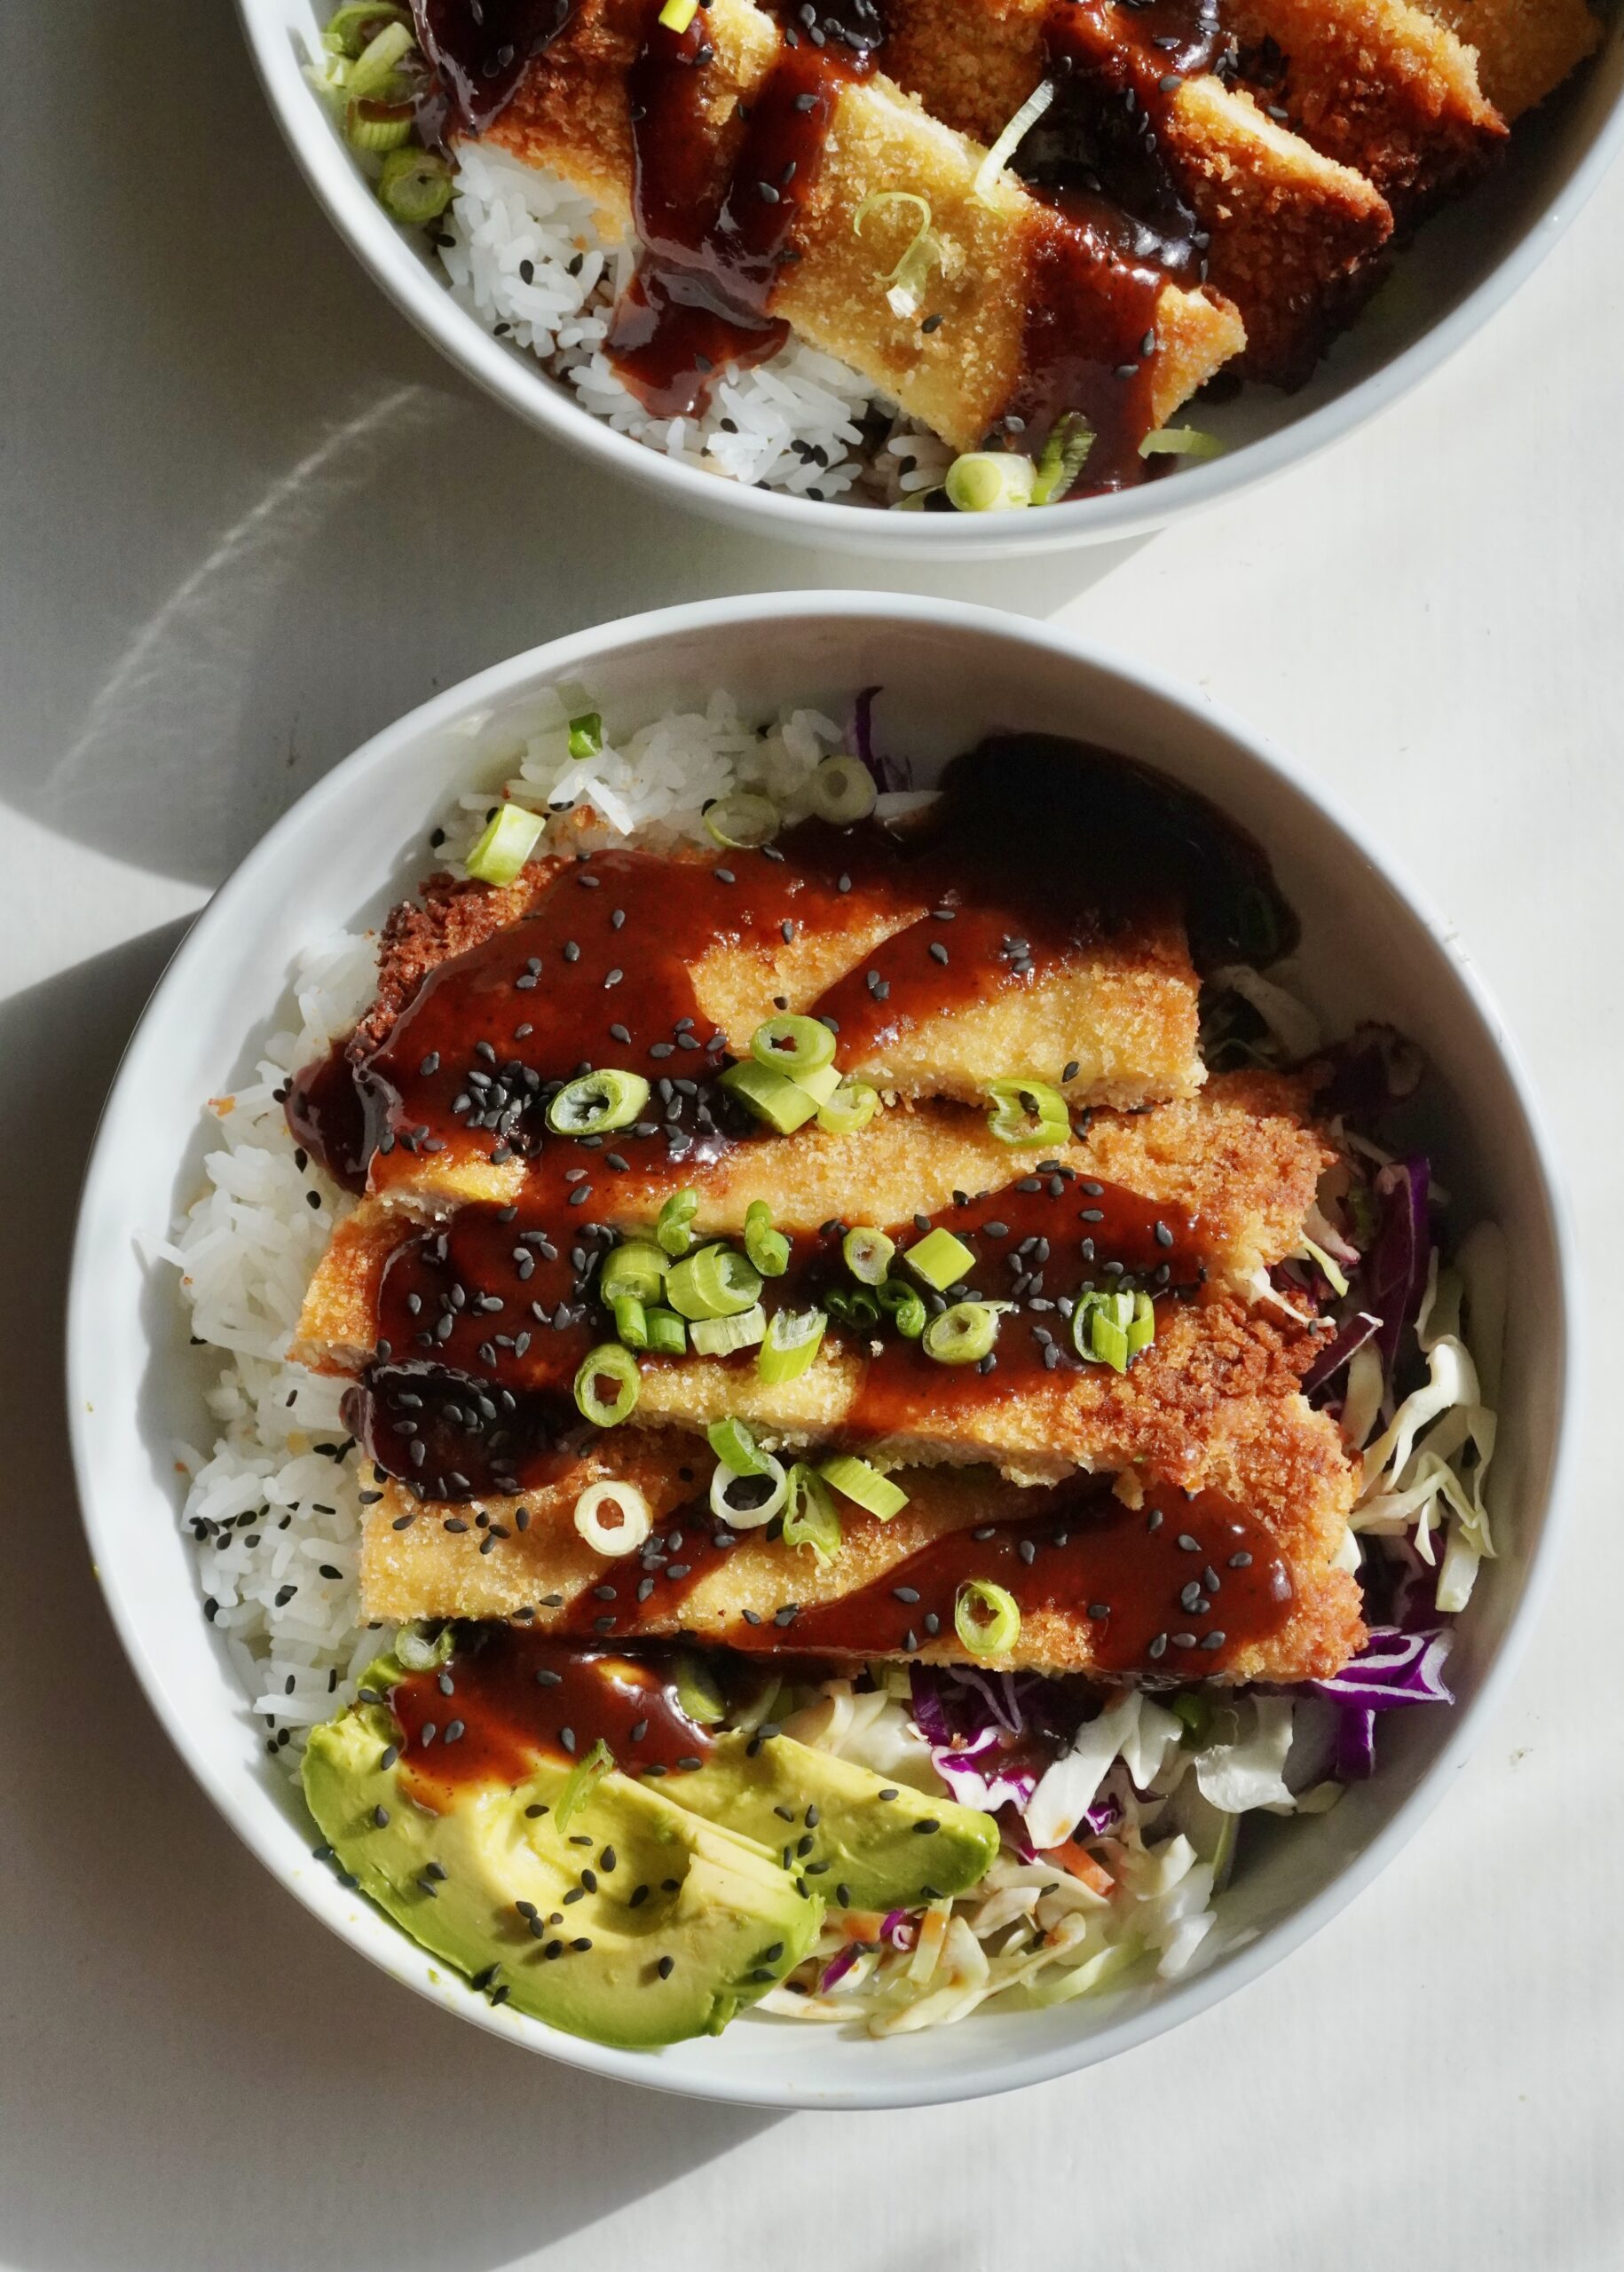
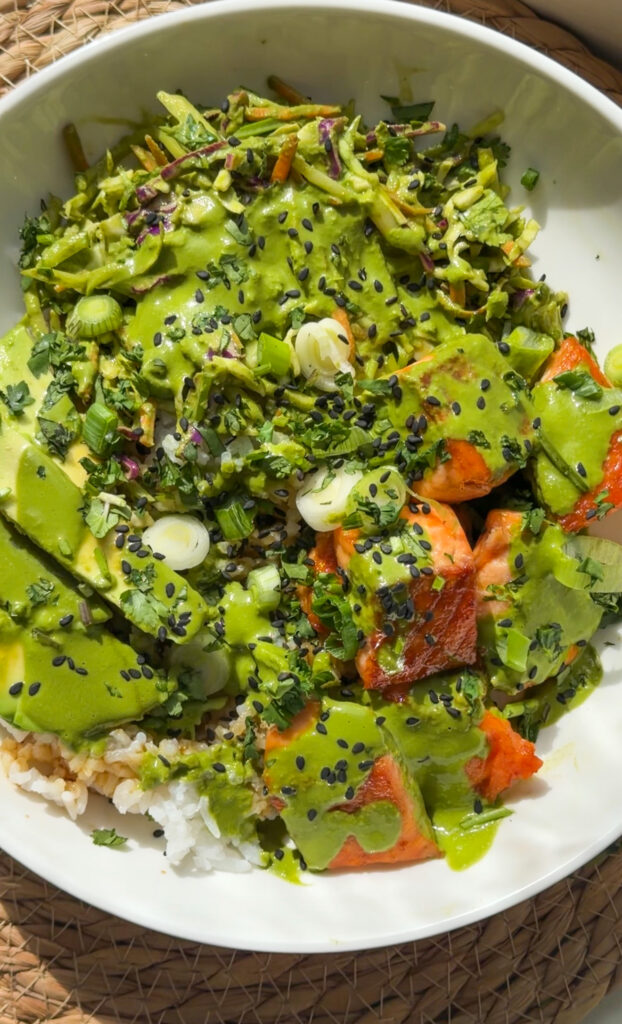
You end up with a massive, crispy cutlet, sliced and resting on a steaming cloud of fluffy rice with crunchy slaw, completely dripping with a glossy, sweet-and-savory tonkatsu sauce. This chicken katsu rice bowl is a masterclass in texture. The crunch of the cutlet. The fluffy rice. And the punchy slaw. All tied together by that wildly addictive tonkatsu sauce. It’s cozy without weighing you down. Incredibly simple but never boring. And of course, a high-reward dinner that’s way more than the sum of effort you put into making it happen.
Why you’ll love this recipe
- Light Yet Genuinely Satisfying: Light and fresh enough for a high-energy lunch, but substantial enough to keep you full through a long Tuesday night. You get all that crispy, savory comfort without the “fried food coma” that usually follows traditional katsu.
- Insanely Fast Prep: Because we press the ground meat directly into the pan, the active prep time is minimal. These chicken katsu rice bowls are easier to make than you might think on any night of the week!
- Highly Versatile: My bowls usually lean on a mix of slaw, creamy avocado, thinly sliced scallions, and a shower of sesame seeds. That said, this is very much a “use what you love” situation. Feel free to mix in other vegetables like sautéed mushrooms, shredded carrots, or extra cabbage to make it your own.
- “Build-Your-Own” Bowl Dinner: There’s no better choice than these chicken katsu bowls for family dinners. Just serve all the components and let everyone build their own just the way they like it.
Substitutions & swaps
- Protein: If ground chicken isn’t your vibe, ground turkey works as a flawless 1:1 swap and bakes up just as perfectly.
- The Base: Standard white Nishiki rice is traditional, but you can absolutely swap in brown rice or quinoa for an extra fiber boost. If you are keeping things low carb, serve the sliced katsu and slaw over a bed of cauliflower rice.
- The Sauce: Store-bought Tonkatsu is great, but my quick homemade mix (see the tips below!) is honestly even better. You can also swap it entirely for a spicy mayo drizzle for a creamy kick.
Tips that matter
Season, Don’t Sauce the Raw Meat: Keep the Tonkatsu sauce far away from the raw chicken mixture. Adding liquid sauce directly into the ground meat will make it impossible to shape and completely ruin the texture of your cutlet.
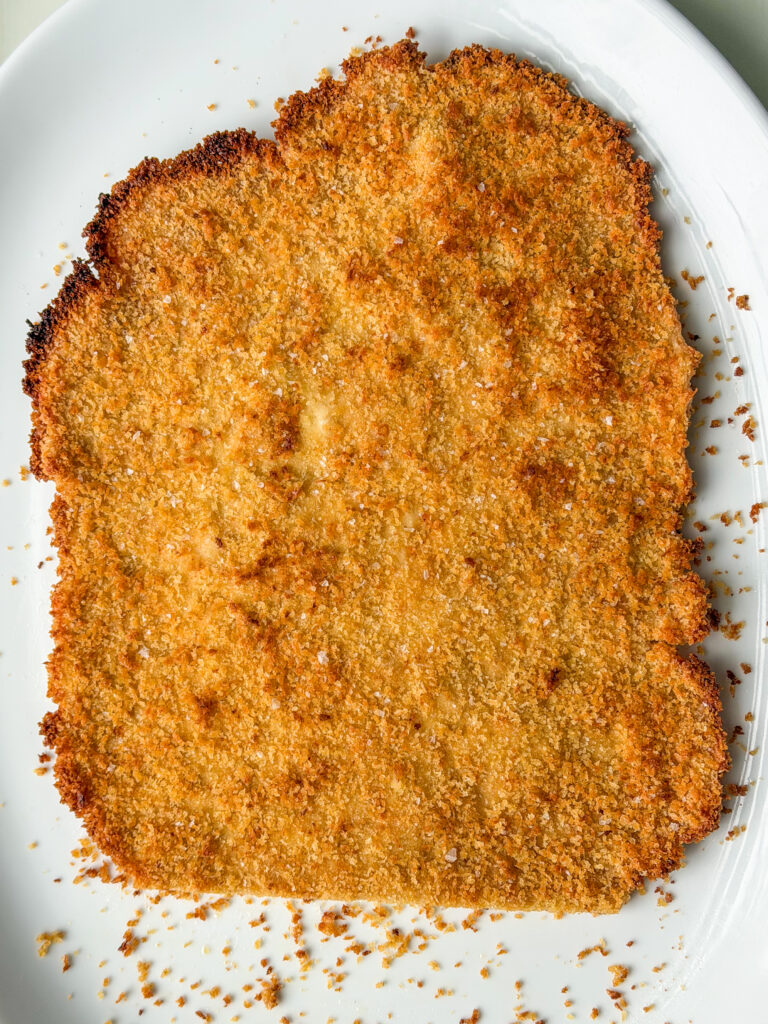
Panko is Power: When breading the cutlet, use plenty of Japanese panko and do not skimp. This is a chicken Katsu bowl, meaning that signature crunch on the outside is non-negotiable.
The Crucial Rest Period: Let the giant cutlet rest on the pan for a few minutes before you even think about cutting into it. This locks the juices inside the meat and keeps the breading from crumbling when you slice it into strips.
Sauce After Baking: Always drizzle your Katsu sauce over the final, baked chicken strips right before eating. Putting the sauce on before or during the oven bake will destroy your perfectly crispy crust.
The Homemade Sauce Hack: If you don’t have store-bought Tonkatsu sauce, simply whisk together ketchup, Worcestershire sauce, soy sauce, honey, and a touch of Dijon mustard. It hits all those same sweet, savory, and tangy restaurant notes in under a minute.
What to serve this with
- A Quick Pickle: A side of quick-pickled cucumbers or radishes adds a sharp, acidic pop that cuts right through the rich, crispy chicken. It perfectly balances the deep savory notes of the Tonkatsu sauce.
- Extra Veggies: Edamame tossed with flaky sea salt makes for a fantastic, high-protein appetizer while the chicken bakes in the oven. You can also throw some roasted broccoli onto the sheet pan during the final few minutes for a warm, charred addition.
When should I make this?
- The Takeout Fake-Out: Whip this out on a Friday night when you are desperately craving Japanese takeout but want something faster and cleaner. These chicken katsu bowls deliver all those rich, satisfying flavors without the heavy deep-fried food coma.
- The Meal Prep Win: Because the components store beautifully when kept separated, this is an elite Sunday prep recipe for a week of high-vibe lunches. You’ll look forward to opening your lunchbox every single day.
Make-ahead, storage & reheating
- Make-Ahead Prep: Mix the ground chicken and press it into its parchment-lined shape up to a day in advance, storing it tightly wrapped in the fridge. Wait to add the flour, panko, and oil until right before baking, so the breading stays perfectly dry.
- Smart Storage: Keep the cooked rice, baked chicken, and slaw in entirely separate airtight containers to prevent the moisture from turning your crust to mush. The cooked components will stay fresh and safe in the fridge for up to four days.
- The Reheat Revival: Reheat the chicken strips in an air fryer at 375°F or a 400°F oven for about five minutes. It completely restores that deep-fried crunch. Microwave the rice with a damp paper towel over the bowl to bring back its fluffy texture before assembling with the cold slaw.
Common mistakes & how to avoid them
- The Dusty Crust: If you don’t use enough avocado oil spray to fully coat the panko, the breadcrumbs will look dry and dusty rather than golden. Spray the top generously until the breadcrumbs look visibly wet, ensuring they actually fry in the oven.
- Soggy Slaw Syndrome: Dressing your cabbage too early draws out all the moisture, leaving you with a sad, watery puddle in your bowl. Toss the slaw with the dressing right before serving so it retains that essential, refreshing crunch.
Crispy Ground Chicken Katsu Bowls
Ingredients
For the Chicken Cutlet
- 1 lb. ground chicken or ground turkey
- ¾ tsp kosher salt
- ½ tsp black pepper
- ¾ – 1 tsp garlic powder
- ¾ – 1 tsp onion powder
- ⅓ – ½ cup all-purpose flour
- 2 eggs whisked together for egg wash
- Japanese panko breadcrumbs to taste
- Avocado oil enough to hydrate breadcrumbs
For the Rice
- 2 cups rice I used Nishiki rice
- 4 cups water or follow package instructions
- Pinch of salt
- Sushi seasoning optional
For the Slaw
- 1 10–12 oz bag slaw mix
- 1 tbsp rice vinegar
- 1 – 2 tsp soy sauce
- 1 tsp sesame oil
- Pinch of salt
- Optional: 1 tsp honey or sugar + squeeze of lime
For the Sauce
- Store-bought tonkatsu sauce
For Finishing
- 2 scallions thinly sliced
- Sesame seeds optional
Directions
- Preheat oven to 450°F. Line a large sheet pan with parchment.
- Mix the chicken with the seasonings. Press onto the sheet pan into a ½-inch thick rectangle.
- Coat with flour, then breadcrumbs. Drizzle oil to fully hydrate.
- Bake for 12-15minutes, then broil for 2-5 minutes until golden.
- Rest, then slice.
- Cook rice.
- Toss slaw with dressing.
- Assemble bowls with rice, slaw, sliced cutlet, and sauce. Finish with scallions and sesame seeds.


Rate & Review
WHAT DID YOU THINK OF THIS RECIPE?