
I used to think that “good” garlic bread was whatever I could find in the frozen aisle. But then I realized: why settle for a cold, flavorless box when you can have a fresh, bubbling loaf of ciabatta in 20 minutes? Once you go homemade, there is absolutely no going back.
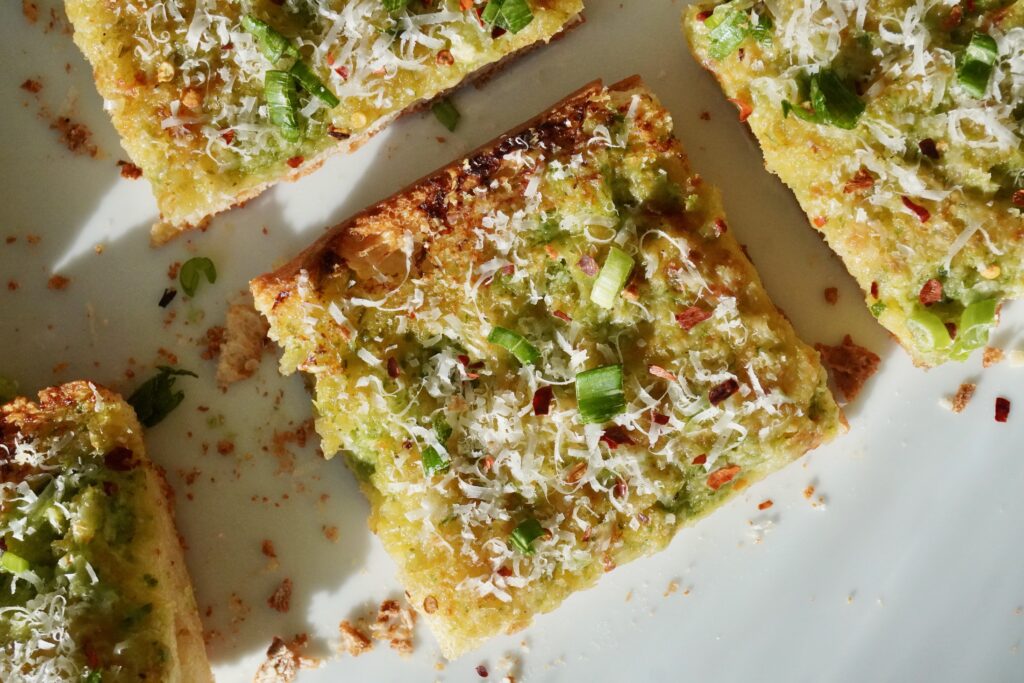
This Spring Onion Garlic Bread is my current obsession. It’s everything you want in a carb-heavy side—buttery, garlicky, and a little bit cheesy. But the addition of fresh spring onions gives it a vibrant, “hello, spring!” energy that those foil-wrapped loaves at the grocery store can’t touch.
While we all love a classic, this Spring Onion Garlic Bread is how we take “good” to “unforgettable.” The secret is all in the compound butter. Instead of just a sprinkle of dried herbs, we’re blending fresh spring onions, a “whole heck of a lot” of fresh garlic, and softened butter into a vibrant green spread that’s basically liquid gold. Using fresh aromatics yields a bright, punchy flavor and results in a perfectly toasted crust with a soft, buttery heart.
Spring onions bring this fresh, almost grassy sharpness that cuts through the richness of the butter in the best way. When they’re blended into a compound butter with garlic, the whole thing turns this wildly pretty shade of green.
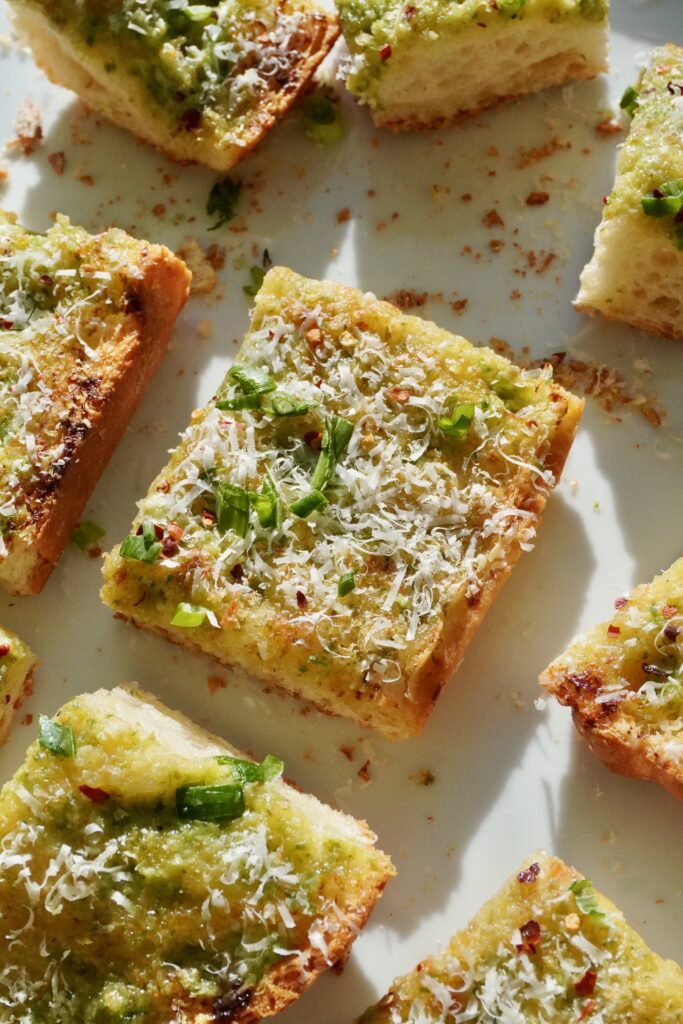
Ciabatta is the move here. All those airy pockets? They’re basically begging to be filled with melted butter. Add Parmesan, a quick bake, and a short broil, and you’ve got crispy edges, a soft, buttery center, and those golden, cheesy bits that everyone fights over. Then we finish with fresh spring onion greens and chili flakes because contrast matters.
Freshly baked out of my oven, I said, “Just a slice.” And suddenly half the loaf was gone, crumbs everywhere, no regrets. Whether you’re sopping up Italian meatballs or just snagging a piece straight off the baking sheet, this homemade garlic bread is the simple, high-impact upgrade your dinner rotation has been waiting for.
Why You’ll Love This Recipe
- Better Than Store-Bought: Once you taste the difference between a freshly blended emerald compound butter and the frozen, foil-wrapped stuff from the store, there is officially no going back.
- The Ultimate Texture Play: By using ciabatta, you get the best of both worlds. A crust that shatters with a satisfying crunch and a pillowy interior that’s basically a sponge for that vibrant spring onion butter.
- A “Sauce-Saving” Superpower: Whether it’s a big bowl of meatballs, a bright marinara, or a creamy Pastina Chicken Soup, these garlicky, cheesy squares ensure not a single drop of flavor is left on your plate. If there is a sauce on your plate, this garlic bread should be on the side.
- Meal Prep Friendly: Spring onion butter stays fresh for weeks, so restaurant-quality garlic bread is only 10 minutes away, even on your busiest Tuesday. Whip up a double batch of the spring onion butter and keep it in the fridge.
- Bistro Vibes at Home: Between the sharp bite of fresh garlic, the mellow sweetness of the spring onion bulbs, and the nutty finish of melted Parmesan, this homemade garlic bread recipe brings that high-end Italian bistro energy straight to your kitchen table.
Tips That Matter
Raw vs. Sautéed: Using the onions raw gives you a bright, punchy intensity. If you prefer a mellower, sweeter vibe, quickly sauté the chopped onions and garlic in a skillet for 2–3 minutes, then blend them into the butter.
The “Extra Butter” Finish: Optional but highly recommended for ciabatta. Since ciabatta is so airy, that final pour of melted butter seeps into the holes, making it restaurant-quality rich.
Watch the Clock: If you like it softer, pull it at 10 minutes. If you’re team “Extra Crispy,” give it another 3–5 minutes—just don’t walk away during the broil!
Airflow is Key: If you have a baking rack, set it on top of your sheet pan. This allows air to circulate under the loaf of garlic bread, keeping the bottom perfectly crisp instead of becoming hard from direct pan contact.
Substitutions and Swaps
- Bread Options: Ciabatta is king for texture, but if you want something softer and more traditional, an Italian loaf or white roll works beautifully.
- Ramp Season Special: During that short window when ramps are available, swap them for the spring onions. Use the bulbs for the butter and the leafy tops for the garnish—it’s a garlicky game-changer.
- Vegan-Friendly: Simply swap in your favorite vegan butter and a dairy-free Parmesan alternative.
- Cheese: Swap Parmesan for Pecorino for a sharper, saltier finish.
What to Serve This With
- Classic Italian Meatballs: For the ultimate “dip and eat” experience.
- Lasagna: Because you can never have too much cheese and carbs.
- Spring Salads: The buttery crunch is the perfect contrast to a fresh arugula salad.
When should I make this
- Dinner parties when you want a guaranteed crowd-pleaser
- Weeknight dinners that need a little excitement
- Game nights or casual hangouts
- Rainy days when carbs feel like therapy
- Any time you have butter and zero self-control
Make-Ahead, Storage & Reheating
- Prep Ahead: You can make the compound butter weeks in advance! Store it in the fridge (or freeze it) and just soften it to a spreadable consistency when the garlic bread craving hits.
- Storage: Keep leftovers covered at room temperature for 1–2 days.
- Reheating: Wrap the bread in foil and warm it in a 350°F oven for about 10 minutes to bring that “just-baked” magic back to life.
Common Mistakes & How to Avoid Them
- Using Cold Butter: Trying to spread cold butter onto soft ciabatta is a recipe for torn bread and uneven flavor. Ensure your butter is truly room temperature before blending. It should be soft enough that a finger leaves an easy indent. This ensures that the vibrant green color incorporates perfectly and spreads like a dream.
- The “Tooth-Cracker” Crust: If you bake the bread for too long without enough butter, the ciabatta will be dried out and difficult to bite. Don’t skimp on the butter! The fat protects the bread’s crumb, keeping it soft and plush while the edges get that perfect golden crunch. If you like it extra soft, wrap the loaf loosely in foil for the first 5 minutes of baking.
- The “Burned Garlic” Bitterness: Garlic can turn from fragrant to bitter in a split second, especially under a broiler. Watch that broiler like a hawk. One minute is usually plenty to get the Parmesan golden. If your oven runs hot, stay right there with the oven light on—don’t walk away to set the table!
- Soggy Bottom Syndrome: If the bread sits directly on a flat baking sheet, the steam from the melting butter can get trapped underneath, making the bottom crust soft and sad. Use a wire cooling rack set inside your baking sheet. This way, the hot air circulates 360 degrees around the loaf, ensuring the bottom stays as crisp as the top.
- The “Butter Surface” Barrier: Sometimes butter just sits on the bread’s surface instead of soaking in, leading to a greasy exterior and a dry interior. Don’t skip the crosshatch scoring! Cutting those shallow squares into the bread’s “crumb” creates little channels that guide the melting spring onion butter deep into the heart of the loaf.
Spring Onion Garlic Bread Recipe

Ingredients
For the Spring Onion Compound Butter
- 1 cup salted butter softened
- 3 – 4 large spring onions with bulbs
- 1 garlic clove
- ½ teaspoon black pepper
- Salt to taste optional
- Optional: small handful chives or parsley for extra green color
For the Bread
- 1 large ciabatta loaf
- ¾ cup finely grated Parmesan cheese
- Reserved dark green spring onion tops thinly sliced
- Optional pinch red chili flakes
For Finishing (Optional)
- ½ cup melted salted butter
- Extra-finely grated Parmesan
- Red chili flakes
Directions
Make the spring onion butter
- Trim the dark green tops from one spring onion and reserve them for garnish. Roughly chop the remaining spring onions, including the bulb and light green stalks.
- Add the spring onions, garlic, pepper, and optional herbs to a food processor and pulse until finely chopped. Add the softened butter and blend until smooth and bright green, scraping down the sides as needed. Taste and add extra salt if needed.
Prepare the bread
- Preheat the oven to 400°F. Slice the ciabatta in half horizontally. Using a knife, cut shallow crosshatch squares into the crumb of each half without cutting through the crust. This helps the butter melt and absorb into the bread.
Spread the butter
- Spread the spring onion butter generously over both halves of the bread, pressing some of the butter down into the cuts. Sprinkle ½ cup of the Parmesan evenly over the top.
Bake
- Place the bread on a sheet pan and bake for 8–10 minutes until the butter is melted and bubbling and the bread is lightly crisp.
Broil
- Turn the oven to broil and broil for about 1 minute until the Parmesan becomes lightly golden.
Finish and serve
- Remove the bread from the oven and sprinkle with the reserved sliced spring onion greens, the remaining ¼ cup Parmesan, and a pinch of red chili flakes.
- If desired, pour or brush melted butter over the bread, allowing it to melt into the cuts and the crumb. This step is optional, but especially delicious with ciabatta because the bread stays crisp while becoming extra buttery.
- Cut into squares and serve warm.


Rate & Review
WHAT DID YOU THINK OF THIS RECIPE?